th.oughts

tech

As a follow up to this post that I wrote a while back, one of things I have been thinking of doing is to have a reliable uninterrupted power supply. The setup is powered by a typical run-of-the-mill power bank which supports passthrough. However, these batteries typically rely on a mechanical relay which introduces a short break when the power switches from battery to mains supply. The unfortunate outcome is a hard power cycle of the RPi during power cuts that is pretty common in this part of the world! So, without further ado, let's look at our options.

A diode setup

Let's consider this simple circuit. Diode as a forward switch

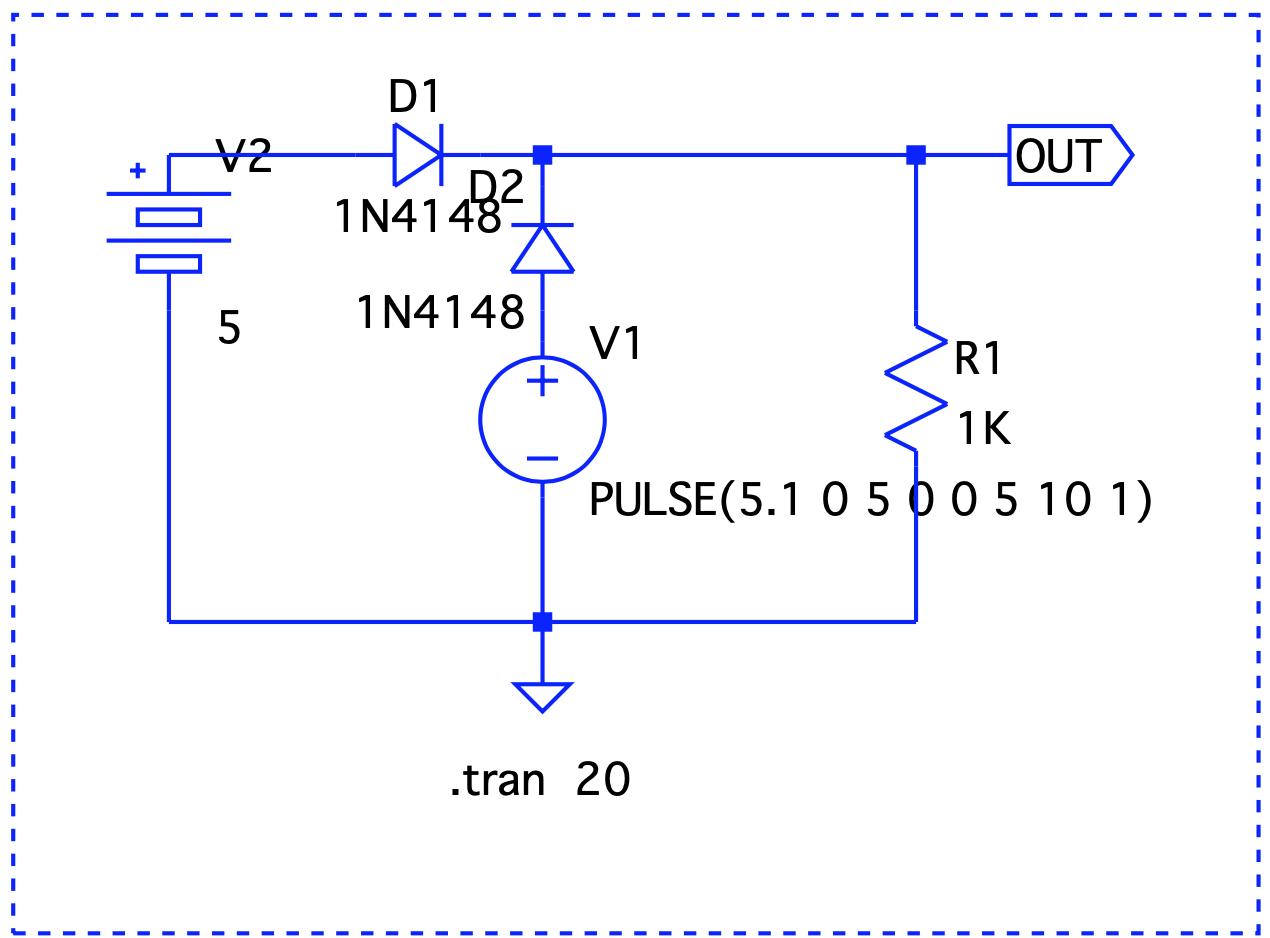
V1 simulates a pulse to show a sudden voltage drop to 0 (simulate a blackout). D1 and D2 are regular silicon diodes with a forward voltage of 0.7v. While the circuit protects the battery from getting damaged when mains is powering the RPi, the voltage drop brings the output voltage down significantly. We can replace these with germanium or Schottky diodes that have lower forward voltage drops. However, these come at the expense of higher reverse leakage currents and lower stability with temperature variations. Let's try something else.

A single MOSFET setup

A MOSFET can act as a switch with a lower forward voltage drop. Let's modify our original circuit and include a P-MOSFET. MOSFET as a switch

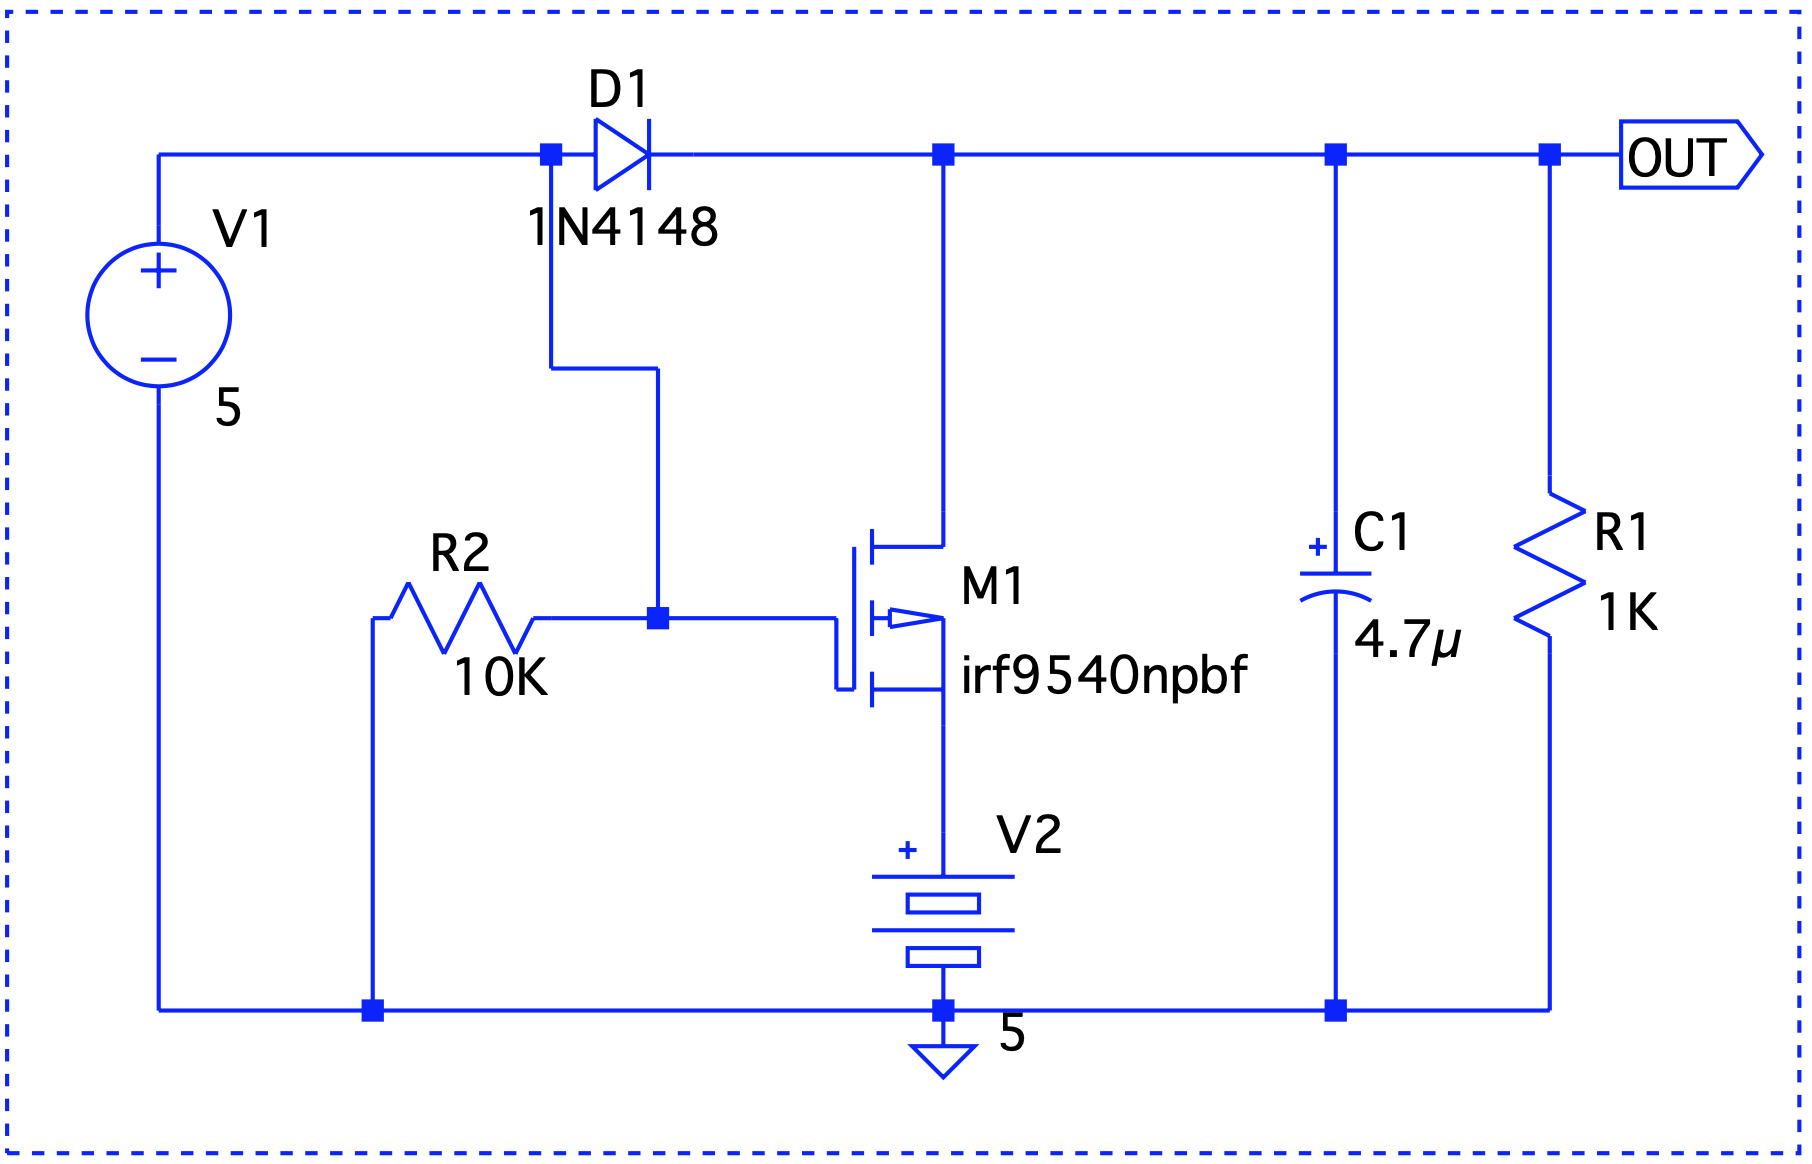
There are two issues here – First, our diode problem still remains and second, M1's drain to source path will try to charge the battery which may be undesirable. To understand why we need the diode, let's take a look at how the MOSFET operates. The P-channel of the MOSFET stops conducting when a positive gate voltage is applied. Now, if V1 were to turn off, M1 turns on and OUT now sources the battery. In the absence of the diode, the gate will be at the same potential as OUT which will turn it off!

Could we replace the diode D1 with another MOSFET ? Let's take a look at a simplified circuit that does that.

Rotated MOSFET setup

There's an important thing to point out – the MOSFETs are rotated, meaning, the source is connected to the point where drain should have been connected and vice versa. So, current always flows from drain to source. Or in other words, the semiconductor acts more as an off switch and simulates and ideal diode. But does it really work ? When V1 is on, there's a positive gate voltage at M2 and so current cannot flow into V2 and damage it. When V1 is 0, M2 is on and conducts in both directions.

We are approaching the ideal diode behavior but there's still a minor hiccup. When V2 > V1, the battery will start discharging even if V1 is on! The solution to that is to add another MOSFET to M2 but rotate it. Yet another issue in the previous circuit is that M1 is always on which might cause current to flow into it from V2 potentially damaging V1. The solution to that is to turn M1 on only when V1 is powering the circuit. This can easily be achieved with the help of a differential pair. The final circuit reflects these changes.

Final Circuit

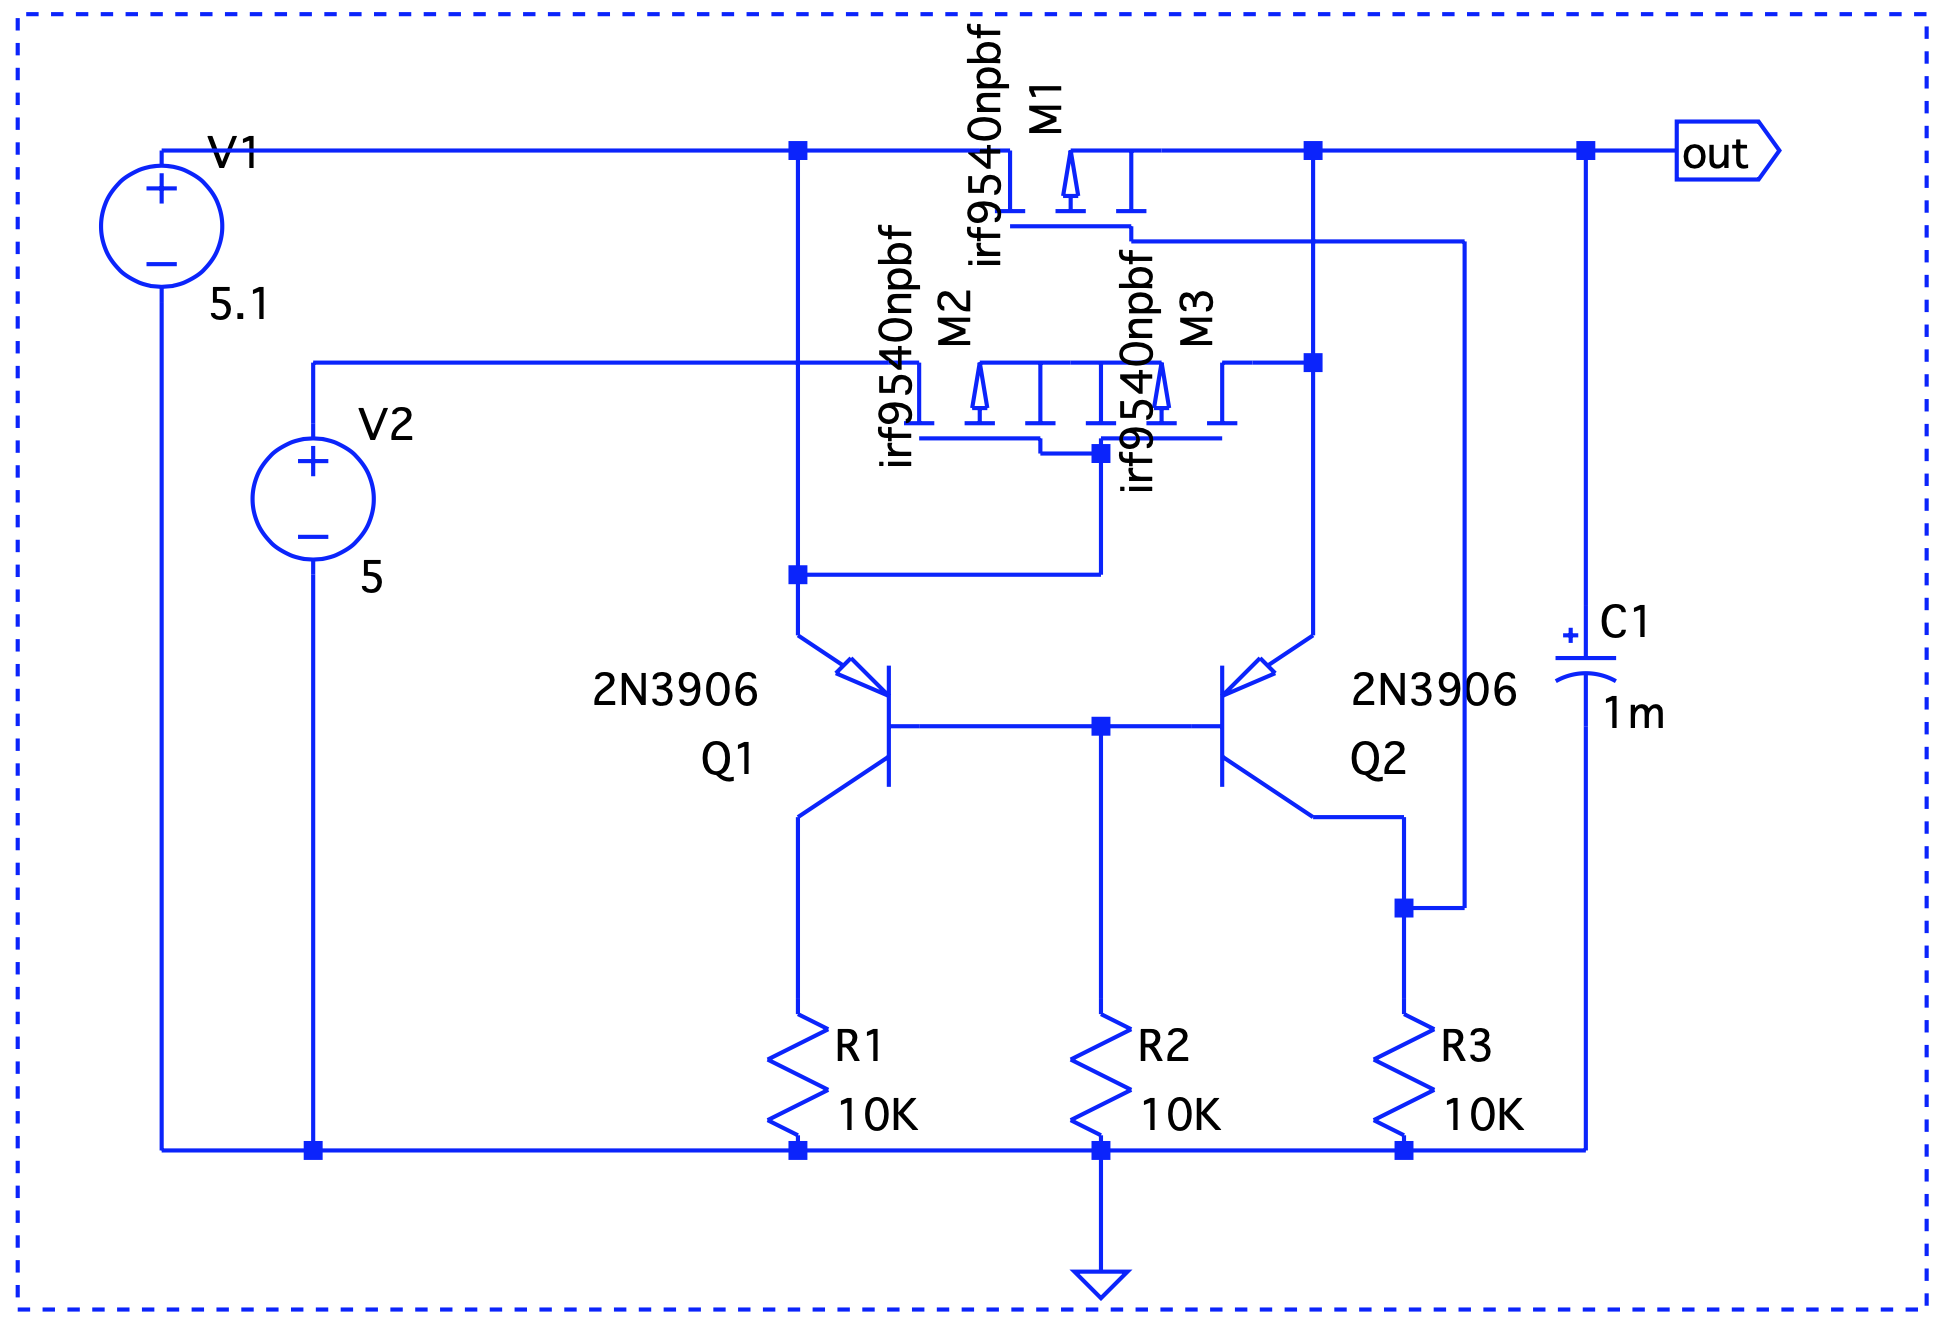
As mentioned above, M2 and M3 are the MOSFETS connected back-to-back and Q1 and Q2 form a differential pair. When V1 is active, Q1 conducts and M3 is off. This prevents current to flow out of V2. When V1 is off, Q2 conducts first which in turn will turn off M1. The battery now powers on the circuit. Let's take a look at a few use cases -

  1. V1 = 5V > V2 = 4.8V Graph1 Here, Vout is V1 – the forward voltage drop, so we are good.

  2. V1 = 4.8V < V2 = 5V Graph2 Even though V1 < V2, it still takes precedence.

  3. V1 simulates a blackout – on/off/on. Graph3 When V1 is on, it drives the output. V2 takes over at t=2 and until t=6.

In the next part, we will decide on taking this circuit out on a drive in the real world and/or investigate solutions that already do this job such as the CAT6500 (now obsolete!).

#tech #diy #electronics #mosfets

Discuss...

A while back, my rusty Sans Digital TowerRAID gave up. Honestly, it had not been a very expensive investment, presumably, at the cost of reliability. Nevertheless, I got a few good years out of it. From the looks of it, it looked like the power supply failed and although, I could have replaced the power supply board, I decided to venture out for future proofing my storage requirements.

Upgrading from a 4 slot JBOD enclosure to 8 disks enclosure

Pretty much everything out there comes at a price of greater than $500 for a 8 slot JBOD. Most of them don't have decent reviews and the ones that do are usually more expensive. That led me to the other option.

DIY

I wanted to explore this option before I splurged on a brand name enclosure. Luckily, there were many helpful resources available that led me to believe this is indeed a possibility. Below, you will find a BOM of what went into my DIY JBOD. The heart of the device is a RAID expander. Ofcourse, you also need to invest in a decent enclosure that houses everything.

RAID Expander ~$60

The item we are looking at is a discontinued Intel RES2SV240 that you can still find on Ebay and some other stores. This was more than enough for my needs – It supports SAS-2. it has 24 ports- 4 ports/1 socket connects to the cable, that in turn connects to the SAS initiator. The rest can be connected to disks – so, you can plug in 20 disks theoretically.

Power Board ~$70

This one's optional in my opinion but it does make the whole setup a little more polished. The one that I used is a SuperMicro CSE-PTJBOD-CB2, again, pretty easily available on Ebay. What this does is let you use the enclosure switch to control power to the system. This would not have been possible otherwise, without a motherboard.

Mini SAS SFF-8088 to SFF-8087 Adapter ~ $25

This will be our portal to the outside world. The SFF-8088 cable (that I already have) will connect the expander to the initiator on the server. The one that I got(CableDeconn) conveniently fits into a full height PCI slot on the enclosure.

SFF-8087 to 4 SATA ~$20

This goes from the RAID expander to the backplane in the enclosure that we will use. Since I plan to use 8 disks, I got two of the cables.

SFF-8087 to SFF-8087 cable ~$8

This cable connects the expander on one end and the SFF-8088 to SFF-8087 adapter on the other end.

Power supply ~$50

Nothing special here, I used a 430W 80+ ATX supply but that's more than what you would need.

Enclosure ~$160

This was the most expensive buy for the project but it's worth it. I decided on a SilverStone CS380B which doesn't have stellar reviews, to be honest, most complained about unsatisfactory ventilation but I was sure I would be fine because I wouldn't install a motherboard in it.

Fitting everything together

The enclosure already has a backplane for the disks. The RAID expander card as well as the SFF-8087 to 8088 adapter both went into a slot on the enclosure where a full height card would usually go. I had to drill some holes so that the power board could stay in place.

Here's a pic of the innards after everything has been fixed in place: Enclosure

Total cost and troubleshooting

Total cost comes out to be ~$400 which is still a good price for a system that can house more than 8 disks (The Silverstone has internal bays for a few more).

There's nothing here that could go wrong. Everything's pretty much plug and play. The only thing worth noting is that the expander card has been discontinued and there's probably not a lot of them out there. You might end up getting a dead card. If things don't work out as expected, just blame it on the card and get a replacement! :)

My setup has been going strong for a few months now. I am glad I went this route!

References: https://www.servethehome.com/sas-expanders-diy-cheap-low-cost-jbod-enclosures-raid/ https://forums.servethehome.com/index.php?threads/diy-jbod-chassis-this-all-i-need.23903/

#tech #diy #jbod

Discuss...

My Dad had a specific set of requirements from a security camera he wanted for our home back in India. When I researched between options, on whether to buy one or to build something, I stumbled upon many builds based on the Raspberry Pi. Most successful builds run Motion on top of a RPi board, or maybe, even Motioneye for a friendlier UI. This post summarizes the issues that I/you are likely to face and what I did about them.

Underwhelming hardware

I used a RPi 3 B board that has a 1.2 Ghz quadcore ARM processor. For processing a video stream and running the motion detection daemon, it's not really very capable and you would end up with stuck/unusable frames on your stream. One of the things that makes a huge difference is the incoming stream frame rate and resolution. I got the best results with sliding down the incoming frame rate to as low as 10 on the camera that I am using.

B vs B+

The B+'s advantage is more on the I/O side and it really doesn't make much of a difference with processing power when it comes to the video stream. On the other hand, the B is more battery friendly which was a major requirement in my setup owing to the frequent power-cuts associated with Indian summers. Overclocking, too, isn't worth it if you consider the battery drain (as high as 20% faster) compared to any noticeable performance gain.

Backup power

As mentioned above, this was an important requirement. I used a 20000 mAH battery that has passthrough. On the downside, when passthrough triggers, there's a momentary disconnect in power which restarts the camera and the RPi which is undesirable but the small downtime is acceptable.

Network

One of the requirements was failover to a backup network but jumping back to the main network once it's back up. A reverse tunnel to a public IP takes care of ssh and http access and could be easily scripted as well. HTTPS is achieved by setting up a nginx reverse proxy on the public facing system and integrating with letsencrypt.

Motion detection

False positives is a major challenge and I could get a good compromise with a mix of a few things: – Setting up a manual mask. This is easy to do with the motioneye http interface. – Using a despeckle filter. Take a look at this article for a nice write up by the author. After experimenting with several combinations, EedDl gave the best results (which also happens to be the recommended starting poin). – Experimenting with thresholds. I used the threshold_maximum parameter to minimize the maximum pixel change. A script changes the threshold value based on input from a LDR similar to this setup.

Usability

The system is easy to use/configure with the Motioneye http interface but to make it a little bit more interesting, I used some NFC tags to enable/disable motion detection. This can be easily done with Tasker along with the NFC plugin for it. This script takes care of syncing up the config file with the current state of motion detection.

#thoughts #tech #diy #rpi #bash

Discuss...

Large file transfers with Media Transfer Protocol (MTP) are very mysterious. The most common search results are about Android users having difficulties with transferring large files and while, this has nothing to do with the MTP specification itself and more to do with the largely deficient Android MTP implementation, MTP typically bears the users' wrath. I believe that part of the stigma associated with MTP has to do with Microsoft being instrumental in its inception. There are some others, for example, the name could have been better! (A person, apparently a storage expert, was actually unaware that Media Transfer Protocol, while focused on media files can actually handle other file types as well!). As to why Android decided MTP to be the default file system is something we can get into in another post but for now, let's get back to the curious case of large files.

The MTP spec could use some clarity for the section on writing large files. The fundamental issue with writes being that the MTP object metadata uses a 32 bit unsigned integer for the file size which limits the file size. The spec mentions that for a file size > 4GB, the size should be set to 0xFFFFFFFF. However, it doesn't clearly specify how to manage the transfer itself (when/how to stop!).

So, can you transfer a > 4GB file with MTP ? Yes, you can and there are two ways to implement it. The first is to use a ObjectPropList, specifically, support SendObjectPropList. This operation has a 8 byte field for object size. However, ObjectPropLists may not be supported by a lot of initiators and even if they are, initiators may decide not to use them for write support.

The second method is mostly reliant on the transport mechanism that MTP mostly relies on, USB. It probably even makes the file size field in the object metadata an optional item. USB guarantees that the end of the data phase will be marked by what is called a short packet. A short packet is a data packet whose size is less than wMaxPacketSize specified by the endpoint descriptor, basically the size of the data buffer in the endpoint. The snippet to handle the write operation in the responder could be something like:

  total_size += incoming_datasize;
  if (incoming_datasize < wMaxPacketSize) {
    /* This is the last packet in this data phase */
    write_buffer_to_file();
    free_buffer();
  }

There's a small hiccup here though. Typically, USB controllers will try to fill up their buffer before sending the data out. So, the above “if condition” may become true even before the actual end of the data phase and mark an incorrect end of data phase. Fixing this is easy though and relies on the fact that the incoming data size will be a multiple of 64 unless it's the end of the data phase:

  total_size += incoming_datasize;
  if ((incoming_datasize % 64) != 0) {
    /* This is the last packet in this data phase */
    write_buffer_to_file();
    free_buffer();
  }

#tech #programming #qemu #mtp

Discuss...

P2P and ready to be stolen!

Sometime in 2012, I made up my mind that I was done with my Bitcoin stash. I had a small collection, which at that time I thought wasn't much. Those were the good old days; I remember websites giving you free coins just for visiting them. Back to the point, I said to myself: “If I needed them later, I will get them again but for now, there's no sense in holding onto them”. So, off I went, transferring my coins to a [presumably] very reputable exchange and sell them for cash. Alas, before I could blink, I saw my account getting drained in small increments. It was almost like a scene from a popular CSI episode that nerds would make fun of for being too good to be true! Well, money was lost and I tried to wipe the experience from my memory somehow believing that it's just a matter of time before cryptocurrencies would be dead anyway. Boy, was I wrong!

Not only have many alt-coins of varied popularity sprung up with large communities thriving around them, they are getting unusual attention, both good and bad from researchers to financial organizations to oppressive governments. And while their fate is still a bit uncertain, news of breaches and stolen bitcoins are still not uncommon. One begs the question: Are cryptocurrencies really solving a problem and introducing another ?

Researchers are often so engrossed in solving a specific problem that they seldom look at the potential advantages of the bad by design (no pun intended) problem. And the cryptocurrencies solution seem to fall into this category. Ofcourse, Anonymity and Decentralization all sound like a step forward and they might be inherently desired but do they always work for the better ? Probably not. One of the many reasons why you don't hear about major breaches at your local bank is because by design, paper currency and the economy that encompasses it make transactions trackable. So, while they do expose your identity which might be undesirable in the greater scheme of things, maybe, a medium of exchange system could mostly benefit from being easily trackable and controlled by a central authority for it to work fairly. It would be difficult to ignore the evidence that paper money's long and successfully history provides in support of this theory.

On the other hand, while the anonymity advantage that digital currencies offer does sound appealing, it's worth pondering if it contributes to making it more difficult to protect it as well. Allow me to explain with an example: A regular bank transaction, by definition, requires an identifiable account holder. Even assuming that someone does hack into your account, there's a certain degree of responsibility that the exchange (read: the bank) has when it comes to protecting your investment. Ofcourse, once alt-coins get widespread recognition and there are standards put in place to protect users, this would be applicable to them too but that's exactly my point! With conventional currency, it's impossible for just anyone to setup an exchange without proper security protocols in place to protect users. That's because the creator of the currency (the government in most cases) has the authority over its usage and disbursement. On the other hand, with the decentralized nature of digital currencies, light regulations have led to rampant fraudulent activities. If there's any consolation, all attacks are on the associated services and not the core software and protocol. But to reiterate on my point, it's worth considering whether the large number of unpleasant hesists associated with bitcoins are directly proportional to the design intended to make it decentralized.

Understandably, it's easy to blame this thought on conservative bias. I do wonder however whether research and innovation and their applications are entirely two separate beasts and worth analyzing very carefully with differently colored eyeglasses. With our constant desire to improve our lives, I believe this ideology should be universally applicable. As a different example, let's consider Autonomous Driving too! Advances in Machine Learning is all good but can a machine's logic really replace the empathetic decision making of a human at the time of a crisis ? That's a topic for some other time!

#thoughts #tech #crypto

Discuss...